Posts tonen met het label velomobiel. Alle posts tonen

maandag 2 juli 2012

"Hindsight"

One of the things that keep coming back in my thoughts is the subject of looking backwards. Even with da Hood on I can still see a lot to the side and back through the side windows, but it is more practical when I can keep my head still and move my eyes to look in a mirror. When I started riding with da Hood, I added a second mirror to the right side of the body. But maybe there are other ways with minimal impact on aerodynamics? As usual such things are most beneficial in racing, so Cycle Vison is a good incentive to do some work in this direction.


In previous posts I already showed the mirrors inside the velomobile hood, thinking that it would only be somewhat practical in racing. It would mean reduced drag, since I could take off the two mirrors on the body of the Mango. Like in the film above is not quite how I rode during the races at Cycle Vision.  I was not quite happy and thought it needed further tweaking. I had to pinch one eye and move my head sideways to see somebody overtaking. What was worse is that I could not move my head freely as I am used to. My glasses could easily get into contact with the mirrors. It was so uncomfortable that it was quickly decided: I took off the right mirror. The track at CV was left corners only so I needed the left mirror the most. In addition (and since I was planning on filming anyway) I placed a bullet camera facing backwards with the screen/recorder unit on the right wheel box. The screen is very small though and the image is not mirrored, so velomobiles seemed to be overtaking on the wrong side. With all the left turns during the three hour race my brain was busy enough already, so it was not very helpful in the end. (though it made very nice shots of the race)


As you can see I also had a camera facing front...
As the mirror can be rotated around on an excentrical ball joint, I could move it outside the side window of da Hood, giving me a better view (and at the same time giving my glasses more clearance). I still had to move my head sideways to have a good look but it was good enough to see when I could cut back to the ideal line in front of a rider I was overtaking. In the "comments" section on YouTube, someone suggested it might be good enough for everyday. Well, not really, but it seemed like a plan worth investigating to me. So after returning from Cycle Vision the glued-on right mount for the mirror was taken off and replaced by a different one. The stem of the mirror was trimmed down even more and with these tweaks I can move the mirror out the window far enough to see behind me without moving my head sideways. I still have to pinch an eye though, but it seems that I might get used to it.

the right mirror gives the best view backwards


mirror partially outside the window

attachment of the mirror to da Hood. Note the
minimalistic  use of material ;-)


With the right mirror being placed to my satisfaction, I will make the same tweaks to the left mirror. It will have to compete though with the rear camera. Really? Yes! While it was very difficult to process all the visual info during the race, riding home in everyday traffic conditions made a much better impression on me. Sure, not having a mirrored image was slightly awkward, but what struck me was that I could see something approaching with ONE glance, instead of looking right AND left into the mirrors. The Vio recording/screen unit does not need much power either. After 7 hours of riding from Lelystad to Groningen, the 4 rechargeable AA batteries were still 40% full. Also here I need to make an adjustment: for the race I had mounted the bullet camera pretty low to give a nice sense of speed to the viewer, but the view towards traffic and the light compensation is much better when the camera is placed higher. I already made a new hole in the top of the Mango body for this, but my first plan to make a stable mount failed. Still some work to be done there.
low mount of the bullet camera, too low...
To my surprise  Cerevellum is also back with it's "Hindsight" rear view cycling computer. I had ordered this device years ago, but the manufacturer could not bring it to the market at the time and I got a full refund. Hopefully they have more more succes this time. It may seem like an expensive mirror, but being able to see what's behind without lumpy mirrors on a velomobile is an attractive prospect to me. For the time I will concentrate on my own system with the Vio unit. Vio has a new HD recorder with greater looking angle than the analog one I have now. If only it would be able to mirror the image it might be perfect for "hindsight" as well as making recordings.

dinsdag 12 juni 2012

Mango racing tweaks, practical for everyday?

It' s not exactly the first time I'm fiddling with my Mango to make it a bit more aerodynamic and stable in the corners so I can be faster in a race. It gets much more interesting when such tweaks can be permanent. If not for going faster than it will make for a safer and less exhausting ride. For that to happen the impact to practical features like maneuverability and serviceability should be very little impacted. That's why I don't do much effort to find ways to extend the tail like for instance the Germans Ludwig and Holger have done in the past for races.  While it is good for aerodynamics and not very complicated to make, it makes the Mango less compact and therefore less practical for everyday.

Aerodynamic tail added to a Mango+ (foto: Theo Zweers)
I (stop! Who: "I".  In fact it was the infamous David Hembrow and Roelf W who initiated this) have tried to use a less inconspicuous way to improve the tail's air resistance with little strips. See: http://youtu.be/OIIGPLlFsHM It looked promising in theory. But then I rode with it and made some comparative rides and concluded that in reality it didn't make significant difference. It seems that the amount of vacuum behind the Mango did not change much.

Anyway, a long tail DOES make sense for races and I might try it myself one day, it's just not handy for everyday.

But like I wrote before there is more to speed than aerodynamics because racetracks and roads alike can have nasty corners that can have a major impact on the overall speed. What usually happens in corners is that, depending on vehicle stability and agility of the rider, one either has to stop pedaling or (Sturmey Archer forbid) even brake. Either way one has to get up to speed after the corner and then the weight of the vehicle works against the rider. My Mango is probably one of the lightest around at 26,5kg but it still is hard work, especially in a long race resulting in many a corner to overcome. Now there are some tricks to get fast through a corner but I don't want you to get too crazy ideas and make loopings in the air (like I have), so I'll discuss the vehicle itself for now.

At some point I got the idea that stability and aerodynamics could be improved in one go. In earlier attempts I had put strips near the front wheel arches like for instance in the photo below, where I put a white strip above the wheel. Other strips were taped on the underside of the body to prevent as much as possible that air gets into the wheelarch.

aero strip taped in the wheel arch

This made not nearly as much aero difference as "da Hood", but to me there was no question after several training rides and races that such strips for the front wheels made me a bit faster. It was almost practical too, but it could get into contact with the tire when the suspension strut of the outer wheel got compressed in a corner, the tire could hit the strip and when the tire wears through that can cause a flat or even a blow out. I had two flats that way in last year's Cycle Vision three hour race. That was a bit depressing, since I was doing rather well. Some people race "all or nothing" and I guess that's the attitude one needs to win now and then, but I prefer to make it to the finish line without troubles. That's how I got champion of the NVHPV summer competition of 2007: I won only one race that year, but I was present at most of the races of the competition, always finished and got me some points.

So how to get the tire away from the strip? The answer lay in the suspension strut. Hold on for the longer explanation: As I was thinking of a way to get more stability it made sense to try and make the track greater, so more distance between the contact patches of the front wheels. Simply extending the tie rods was not going to cut it, because the wheels would get outside the wheel arch and into the airstream. You can say goodbye to aerodynamics when you do that, but... when you put the top of the suspension struts inward (closer to eachother) the wheel will go inside the wheel arch again. In effect this means more negative camber. Now somewhere in the back of my head I knew that too much negative camber means more rolling resistance. So I did some roll-out tests at my regular test-bridge and was relieved to see that I was still rolling about the same distance as before.

I had to drill two holes, 9mm next to the old ones. This does make fitting bigger tires inconvenient, since they will scrape the inside of the wheel arch when cornering sharply. Oh well, I was really getting into the fast Durano 28-406 tires anyway....

to the right of the nut, light coming through the old hole
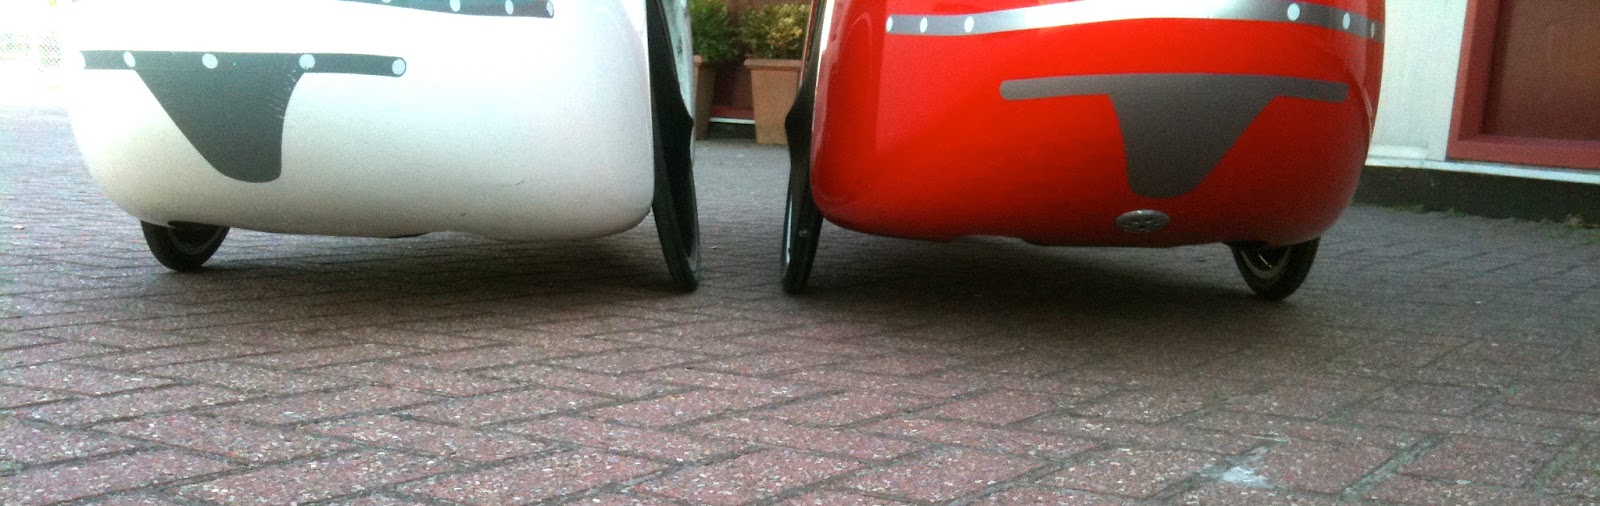
The result of this can be seen below: left is my modded Mango Sport and right is a standard Mango Sport. My wheels are clearly at a greater angle to the vertical and the track is widened by 2,5cm
Hmmm, but wait a minute, looking more closely at the foto, isn't the white Mango lower than the other?

white Mango: more negative camber

The plot thickens now, because I did something else to improve stability: lower the centre of gravity. I lowered the Mango by about 2cm by shortening all the springs in the suspension struts.

white/grey Mango is 2 cm lower

To make things even more complicated and to prove that I am in no way doing a scientific research here, I also gave the wheels a bit more positive caster by shortening the tie rods between the front of the wheel arch and suspension strut. I already found in an earlier temporary modification that this makes the steering a bit heavier and thus less sensitive to undeliberate or unconscious steering input and other influences. In the flat Netherlands I do not feel much diference from more positive caster, but it might be very good in a fast downhill. For an online explanation of camber and caster: http://www.yospeed.com/100304-wheel-alignment-explained-camber-caster-toe.php

So what have I achieved now? Well amongst others the wheel at the top are more inward in the wheel arch and this means that when I put an aerostrip over it, it will not touch the tire easily. I can even make the strip bigger.


This should give me a greater aero advantage than the previous, smaller strips. I can steer sharply (although turning radius has increased a bit) and even under load the tire dos not touch the strip. Ok, so the stiffer shorter suspension also helps there, granted. 

So how practical is my machine now, is it worth it? The future will tell, but one thing is already clear: It won't be fun to get on a sandy trail, since the narrow high pressure tires will sink easily into the sand. The smoother the road the better the comfort is with these tires. Then again, when the changes are a bit less drastic I am sure that 35-406 Kojaks will also fit and that is a pretty standard velomobile tire.
Ohw, I almost forget: stability did indeed get significantly better. All the corners on my commute can be dealt with faster than before and it is easy to control the Mango. I am even thinking of picking up an old habit to try and beat my fastest commuting time. If only the other commuters and schoolkids wouldn't look so angry in my mirror when I swoosh by them..... I meet them everyday, so I'd better stay friends.

Can something be done to get the full range of up to 42-406 tires for the Mango Sport back? Yes there is, but it is not simple, because it means changing the molds of the Mango. These molds are very capital intensive, since it took very long to make them. Changing the wheel arches of the Mango molds to allow for more negative camber will mean a big investment.... For now I will keep on making small adjustments to the wheel alignment to make the most of what we have now.

dinsdag 9 november 2010

Weight wining, price fighting, part 2: the shifter.

If you want to make a bike lighter then you will need to look at all the components. But the bike has to perform well also, so sometimes it is better not to push to the limit. We have an interesting choice when it comes to the shifters: either I choose very good performance or I can choose the lowest in weight...


This is the 500TT shifter from SRAM. It is compatible with my X0 shifter since it pulls cable length at the 1:1 ratio that the derailer is designed for. Not compatible with Shimano components. Price is 112euro. It's not a very common component, so I didn't bother looking around for a lower price too much.
Thumb shifters in a Quest are unusual, but I have used Shimano Ultegra thumb shifters in my Mango Sport and I'm very pleased with the accurucy and ease of shifting. The steer in Mango and Quest are the same, so I see no reason why it wouldn't work.
It is not particularly light at 194gramm, but still some 20gramm lighter than the standard X9 gripshifters that come with the Quest. I could have bought the 900TT, but it's only 16 gramm lighter and costs some 40 euro more. Most probably both working equally well, so it's not worth the extra bucks.


This is a cheaper shifter at 63 euro incl. shipping (found it even cheaper later on at http://luckynino.blogspot.com, tip from Jeroen Koeleman). At the moment it is the only production 10-speed gripshift and it was only by accident that I saw them on the site of the lightweight cassette manufacturer RECON. The SEC S-light 10-speed shifter comes in a version for SRAM XX derailers and a slightly cheaper version for Shimano derailers. Their weight is minimal and also much lighter than the SRAM gripshifters. We had a Shimano type SEC shifter installed on a bike at work. My first impression was that it shifts precise enough, but very very light and not consistent in all the gears. When I made a testride, I sometimes upshifted unwillingly two gears at a time. Maybe it's something to get used to, we'll see.
The low weight is tempting, so I will try these first. If I find these shifters to be ok, I might sell the 500TT shifters.

More components will follow later.

maandag 8 november 2010

Weight wining, price fighting.

I'm becoming more and more of a weight weenie, it's becoming a bit of an obsession.... That may be a bit strange for a flatlander, but I find the handling and ease of acceleration of a light velomobile so much superior, that I've decided to spend some time and money to find out how to make a lighter Quest (my Mango Sport already has lightweight components) without sacrificing any of the practical features. It's no use to have a lightweight velomobile when it's components are to weak, right? There are plenty of exceptions to the rule that lighter is weaker however. Take the KMC X10SL chain: it is tougher than most heavier chains and the Ti-N coating makes for less wear and better shifting. There are three typical racing-bike lengths lying on my kitchen scale here, that's about how much I need for a Quest. One length of 114 links is 742:3=247 grams. That includes a 'missing link".  I found a cheap webshop that doesn't sell the chain one length at a time in a nice package, but straight from the roll. It was 105 euro (shipping included) and that saved me 40 euros from the cheapest eBay seller!? Another nice thing: I don't have to link the three chains.
But what about the weight reduction? Well that depends what quality chain you compare with, but even when compared to other light 10-speed chains, this one gives me about 120gramms reduction.


 Chains run over a cassette and RECON makes the lightest of them all. 108 gramm for an 11-27 10-speed cassette is amazing. They usually don't come cheap and they are hard to find. A Taiwanese seller said to have some for less than 100euro but after ordering it appeared to be out of stock. I got a full refund, no problem but no cassette either. I even e-mailed the manufacturer in Taiwan and he replied very correctly that an Italian reseller had all possible cassettes from RECON. But I don't want all, I just want the cheapest 11-27! So I looked around again with google and finally found a shop at the other side of the ocean that had my size for 130 euro (incl. shipping). That's a lot of money for a cassette that wears and will have to be replaced. The enclosed drivetrain ensures a long life I reckon. Light cassettes from SRAM and Shimano are mostly twice the weight of this one and are pretty expensive nonetheless. That's why I chose this one, giving me the greatest bang for the buck.
The reason that these cassettes are so light is that they were CNC fraised out of a solid piece of aluminium. Everything unneccesary is simply "grinded" away, like Apple is doing with the aluminium frame of the MacBook, making it stiffer then when made of seperate small parts bolted together. Aluminium is not very wear-resistant, but the ceramic coating should help. I have had a RECON 12-23 cassette on my Mango Sport for about 2000km now and see no wear so far, so I'm pretty confident it won't wear before the chain does. (edit: I have paid way too much, you can find RECON cassettes on the blogspot of luckynino, tip from Jeroen Koeleman for 50euro excl. shipping)


The derailer I chose is the X0 SRAM with medium cage. They have a very good reputation and I have good experiences with the X5 that has the same construction. I could get a good deal on Marktplaats from a bicycle mechanic. It's brand new and he wanted 20euro below the normal price of about 160 euro, but looking at eBay I found one seller that was significantly cheaper at 117euro. I confronted the man with this fact and after some tough negotiating we agreed on 118,35euro (incl. shipping).

X5 would have costed me about 60euro and it weighs 300gramm. The X0 has significantly less play mounted to a derailer hanger. The X5 is good enough for 9-speed but I think I will need better quality for a 10-speed system. Together with a weight reducion of a third, I think I made a pretty good deal. A derailer can last very long in a velomobile and then you'd better have one that shifts reliably.


More components to follow.....