When I write this, it is Sunday and I am in Arcen, Limburg at the Reception (good wifi-signal) of campsite "Klein Vink". On Thursday I started my trip with a fully loaded Mango with the idea to check the tracks I had mapped out in ridewithgps.com for the EuroTour2013. As usual when I do not have the discipling force of a group ride, I started late, way too late. It was not until 11.30AM before I set out to my destination: campsite de Paasheuvel, but since I skipped the velomobilebuilders in Dronten I could win some time. The track that I mapped looked like this: http://ridewithgps.com/routes/1566205 and I stayed pretty close to it: http://connect.garmin.com/activity/212372761
Not only the tracks were to be tested, but also the campsites. The "Paasheuvel" had looked promising on the Internet and it sure has plenty capacity in a nice setting. The requirements to be met are higher than that though: some 100people in tents and a few vehicles and all will need to charge their batteries, GPS, smartphone and whatever. On top of that it would be very nice to have access to wifi, so blogs can be updated, photos uploaded and maybe even a little movie can be put on YouTube. Upon my arrival at 6PM I had an extensive chat about this with the staff. They had several suggestions that I checked out the next morning.
The next morning.... I woke up late and made a long stroll around the campsite to see the possibilities. I saw only one field that was just perfect: the Ligweide behind the pond. Yes, there is even a pond that we can dip in right after pitching the tents (or before). This field has plenty space, the SAG vehicles can also be there and there are power outlets. (Note: we will need the special three pinned converter for campers and caravans). We maybe can "borrow" some electricity from the standard European outlets in the nearby washroom. Wifi is not free and may not be strong enough at the field itself, but it is available. (I did not take the wifi option, because I could not think of much use for it at the time).
As to be expected I got away late again 10:30AM The mapped track: http://ridewithgps.com/routes/1563685 The distance was about the same, but.... today was hot, burning sun all day and I had to climb. "What?", you might say, "you're still in the Netherlands, what climbing of significance can that be?". It's true that we do not have mountains and most of the Netherlands is flat, but there are some "glacial tills" or "moraines" that were pushed up during several Ice Ages. The first one "de Veluwe" was unavoidable and besides, it is simply nice riding through moors and forests. The second one between Nijmegen and Germany along the river "Waal" (part of the Rhine) we could go around and maybe we will when somebody comes up with a better route. I chose to again take a route that was the nicest in my view along the "Zeven Heuvelen Weg" (seven hills road) and the river Maas. I would have enjoyed it even more when it hadn't been so blazingly hot. I stopped several times for a place in the shade or at an ice cream parlor to give my body time to cool down. I could sometimes feel a heat stroke closing in, but the pauzes, together with a lot of drinking and spraying myself wet with water from the spray bottle prevented that from happening. My average was disgracefully low, but anyway, I simply did not go to Beyss in Straelen at the same day and stopped at te campsite near Arcen (Klein Vink) that I had picked beforehand. So instead of 160km I did around 130km and arrived at about 6PM. This big campsite is quite ok and it has many facilities, like supermarket, restaurant, Spa and swimming inside and outside, (and you can even have a dialysis for your kidney) but it's also quite expensive while the place for tents on a hilltop (a steep challenge) between trees is nice, but has no power. The price for wifi is extraordinary high :-( Signal strength is excellent throughout the site it seems.
After I installed myself, I learned from others campers that the next day would be even hotter, so here I am at 3:15PM, sitting with my laptop below two blowers at the Reception instead of pushing on and landing at a hospital ;-) Next will be a place in the shade at the waterfront and sit this day out. Phew, it's hot!

A blog about H@rry's experiences with his Mango Sport and ROAMango.
zondag 19 augustus 2012
donderdag 5 juli 2012
MUV, Mango Urban Vehicle
I always used to think of a velomobile mainly suitable for long distance touring and commuting. So when I came to live in a big city, I didn't think I would often take the Mango into the town centre. Meanwhile however, my other bikes do nothing but gather dust. All rides are done by the Mango: short and long. To show how useful a Mango can be in urban area and city centre, I made a new playlist on my YouTube channel to show that especially an agile and light velomobile like the Mango is very much at home there.
My first problem is: how to film myself while cruising through the city. The solution is obvious, one simply asks a friend to come along and be filmed. The result is below and more of such vids are likely to follow in the "MUV" playlist of the HuneliggersChannel
BTW: the footage is made by my new camera: Vio POV.HD Please set the quality to 1080pHD, but when the video looks choppy on your screen it might be better to choose a lower setting.
dinsdag 3 juli 2012
"Hindsight" addition
I realized that the photos in my previous post were not giving a very good image of what you see in the mirrors on the body and in da Hood. So.....
At first sight the field of view does not seem to different. In both cases I can conveniently look in the mirror without turning my head. The mirror in da Hood is at a slight disadvantage however, because it's impossible to see what goes on straight behind. More importantly: I have to pinch an eye to see clearly. I have noticed that in low light conditions I CAN see with both eyes open. Could it be that it's something that I can train?
CONCLUSION, after riding with mirrors inside for a week: for me this is only for racing. The disadvantages are too great for everyday use. What disturbs me the most is the fact that my glasses sometimes hit the mirrors. That is distracting and annoying.
 |
| mirror in da Hood: one can just see the lantern post but not what is directly behind |
 |
| mirror on the normal position, the body: Watch the lantern post in the mirror. I can see what is going on straight behind the Mango |
At first sight the field of view does not seem to different. In both cases I can conveniently look in the mirror without turning my head. The mirror in da Hood is at a slight disadvantage however, because it's impossible to see what goes on straight behind. More importantly: I have to pinch an eye to see clearly. I have noticed that in low light conditions I CAN see with both eyes open. Could it be that it's something that I can train?
CONCLUSION, after riding with mirrors inside for a week: for me this is only for racing. The disadvantages are too great for everyday use. What disturbs me the most is the fact that my glasses sometimes hit the mirrors. That is distracting and annoying.
maandag 2 juli 2012
"Hindsight"
As you can see I also had a camera facing front...
As the mirror can be rotated around on an excentrical ball joint, I could move it outside the side window of da Hood, giving me a better view (and at the same time giving my glasses more clearance). I still had to move my head sideways to have a good look but it was good enough to see when I could cut back to the ideal line in front of a rider I was overtaking. In the "comments" section on YouTube, someone suggested it might be good enough for everyday. Well, not really, but it seemed like a plan worth investigating to me. So after returning from Cycle Vision the glued-on right mount for the mirror was taken off and replaced by a different one. The stem of the mirror was trimmed down even more and with these tweaks I can move the mirror out the window far enough to see behind me without moving my head sideways. I still have to pinch an eye though, but it seems that I might get used to it.
 |
| the right mirror gives the best view backwards |
 |
| mirror partially outside the window |
 |
| attachment of the mirror to da Hood. Note the minimalistic use of material ;-) |
With the right mirror being placed to my satisfaction, I will make the same tweaks to the left mirror. It will have to compete though with the rear camera. Really? Yes! While it was very difficult to process all the visual info during the race, riding home in everyday traffic conditions made a much better impression on me. Sure, not having a mirrored image was slightly awkward, but what struck me was that I could see something approaching with ONE glance, instead of looking right AND left into the mirrors. The Vio recording/screen unit does not need much power either. After 7 hours of riding from Lelystad to Groningen, the 4 rechargeable AA batteries were still 40% full. Also here I need to make an adjustment: for the race I had mounted the bullet camera pretty low to give a nice sense of speed to the viewer, but the view towards traffic and the light compensation is much better when the camera is placed higher. I already made a new hole in the top of the Mango body for this, but my first plan to make a stable mount failed. Still some work to be done there.
 |
| low mount of the bullet camera, too low... |
dinsdag 12 juni 2012
Mango racing tweaks, practical for everyday?
It' s not exactly the first time I'm fiddling with my Mango to make it a bit more aerodynamic and stable in the corners so I can be faster in a race. It gets much more interesting when such tweaks can be permanent. If not for going faster than it will make for a safer and less exhausting ride. For that to happen the impact to practical features like maneuverability and serviceability should be very little impacted. That's why I don't do much effort to find ways to extend the tail like for instance the Germans Ludwig and Holger have done in the past for races. While it is good for aerodynamics and not very complicated to make, it makes the Mango less compact and therefore less practical for everyday.
I (stop! Who: "I". In fact it was the infamous David Hembrow and Roelf W who initiated this) have tried to use a less inconspicuous way to improve the tail's air resistance with little strips. See: http://youtu.be/OIIGPLlFsHM It looked promising in theory. But then I rode with it and made some comparative rides and concluded that in reality it didn't make significant difference. It seems that the amount of vacuum behind the Mango did not change much.
Anyway, a long tail DOES make sense for races and I might try it myself one day, it's just not handy for everyday.
But like I wrote before there is more to speed than aerodynamics because racetracks and roads alike can have nasty corners that can have a major impact on the overall speed. What usually happens in corners is that, depending on vehicle stability and agility of the rider, one either has to stop pedaling or (Sturmey Archer forbid) even brake. Either way one has to get up to speed after the corner and then the weight of the vehicle works against the rider. My Mango is probably one of the lightest around at 26,5kg but it still is hard work, especially in a long race resulting in many a corner to overcome. Now there are some tricks to get fast through a corner but I don't want you to get too crazy ideas and make loopings in the air (like I have), so I'll discuss the vehicle itself for now.
At some point I got the idea that stability and aerodynamics could be improved in one go. In earlier attempts I had put strips near the front wheel arches like for instance in the photo below, where I put a white strip above the wheel. Other strips were taped on the underside of the body to prevent as much as possible that air gets into the wheelarch.
This made not nearly as much aero difference as "da Hood", but to me there was no question after several training rides and races that such strips for the front wheels made me a bit faster. It was almost practical too, but it could get into contact with the tire when the suspension strut of the outer wheel got compressed in a corner, the tire could hit the strip and when the tire wears through that can cause a flat or even a blow out. I had two flats that way in last year's Cycle Vision three hour race. That was a bit depressing, since I was doing rather well. Some people race "all or nothing" and I guess that's the attitude one needs to win now and then, but I prefer to make it to the finish line without troubles. That's how I got champion of the NVHPV summer competition of 2007: I won only one race that year, but I was present at most of the races of the competition, always finished and got me some points.
So how to get the tire away from the strip? The answer lay in the suspension strut. Hold on for the longer explanation: As I was thinking of a way to get more stability it made sense to try and make the track greater, so more distance between the contact patches of the front wheels. Simply extending the tie rods was not going to cut it, because the wheels would get outside the wheel arch and into the airstream. You can say goodbye to aerodynamics when you do that, but... when you put the top of the suspension struts inward (closer to eachother) the wheel will go inside the wheel arch again. In effect this means more negative camber. Now somewhere in the back of my head I knew that too much negative camber means more rolling resistance. So I did some roll-out tests at my regular test-bridge and was relieved to see that I was still rolling about the same distance as before.
I had to drill two holes, 9mm next to the old ones. This does make fitting bigger tires inconvenient, since they will scrape the inside of the wheel arch when cornering sharply. Oh well, I was really getting into the fast Durano 28-406 tires anyway....
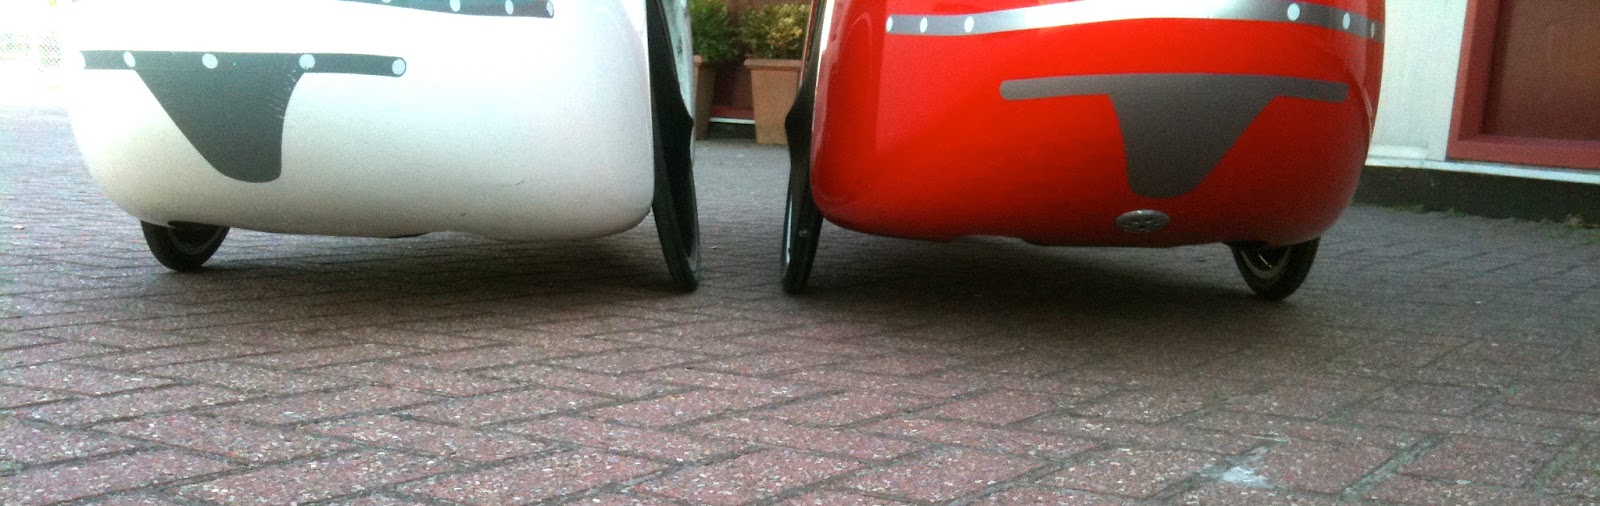
The result of this can be seen below: left is my modded Mango Sport and right is a standard Mango Sport. My wheels are clearly at a greater angle to the vertical and the track is widened by 2,5cm
Hmmm, but wait a minute, looking more closely at the foto, isn't the white Mango lower than the other?
The plot thickens now, because I did something else to improve stability: lower the centre of gravity. I lowered the Mango by about 2cm by shortening all the springs in the suspension struts.
To make things even more complicated and to prove that I am in no way doing a scientific research here, I also gave the wheels a bit more positive caster by shortening the tie rods between the front of the wheel arch and suspension strut. I already found in an earlier temporary modification that this makes the steering a bit heavier and thus less sensitive to undeliberate or unconscious steering input and other influences. In the flat Netherlands I do not feel much diference from more positive caster, but it might be very good in a fast downhill. For an online explanation of camber and caster: http://www.yospeed.com/100304-wheel-alignment-explained-camber-caster-toe.php

 |
| Aerodynamic tail added to a Mango+ (foto: Theo Zweers) |
Anyway, a long tail DOES make sense for races and I might try it myself one day, it's just not handy for everyday.
But like I wrote before there is more to speed than aerodynamics because racetracks and roads alike can have nasty corners that can have a major impact on the overall speed. What usually happens in corners is that, depending on vehicle stability and agility of the rider, one either has to stop pedaling or (Sturmey Archer forbid) even brake. Either way one has to get up to speed after the corner and then the weight of the vehicle works against the rider. My Mango is probably one of the lightest around at 26,5kg but it still is hard work, especially in a long race resulting in many a corner to overcome. Now there are some tricks to get fast through a corner but I don't want you to get too crazy ideas and make loopings in the air (like I have), so I'll discuss the vehicle itself for now.
At some point I got the idea that stability and aerodynamics could be improved in one go. In earlier attempts I had put strips near the front wheel arches like for instance in the photo below, where I put a white strip above the wheel. Other strips were taped on the underside of the body to prevent as much as possible that air gets into the wheelarch.
 |
| aero strip taped in the wheel arch |
So how to get the tire away from the strip? The answer lay in the suspension strut. Hold on for the longer explanation: As I was thinking of a way to get more stability it made sense to try and make the track greater, so more distance between the contact patches of the front wheels. Simply extending the tie rods was not going to cut it, because the wheels would get outside the wheel arch and into the airstream. You can say goodbye to aerodynamics when you do that, but... when you put the top of the suspension struts inward (closer to eachother) the wheel will go inside the wheel arch again. In effect this means more negative camber. Now somewhere in the back of my head I knew that too much negative camber means more rolling resistance. So I did some roll-out tests at my regular test-bridge and was relieved to see that I was still rolling about the same distance as before.
I had to drill two holes, 9mm next to the old ones. This does make fitting bigger tires inconvenient, since they will scrape the inside of the wheel arch when cornering sharply. Oh well, I was really getting into the fast Durano 28-406 tires anyway....
 |
| to the right of the nut, light coming through the old hole |
Hmmm, but wait a minute, looking more closely at the foto, isn't the white Mango lower than the other?
 |
| white Mango: more negative camber |
The plot thickens now, because I did something else to improve stability: lower the centre of gravity. I lowered the Mango by about 2cm by shortening all the springs in the suspension struts.
 |
| white/grey Mango is 2 cm lower |
To make things even more complicated and to prove that I am in no way doing a scientific research here, I also gave the wheels a bit more positive caster by shortening the tie rods between the front of the wheel arch and suspension strut. I already found in an earlier temporary modification that this makes the steering a bit heavier and thus less sensitive to undeliberate or unconscious steering input and other influences. In the flat Netherlands I do not feel much diference from more positive caster, but it might be very good in a fast downhill. For an online explanation of camber and caster: http://www.yospeed.com/100304-wheel-alignment-explained-camber-caster-toe.php
So what have I achieved now? Well amongst others the wheel at the top are more inward in the wheel arch and this means that when I put an aerostrip over it, it will not touch the tire easily. I can even make the strip bigger.

This should give me a greater aero advantage than the previous, smaller strips. I can steer sharply (although turning radius has increased a bit) and even under load the tire dos not touch the strip. Ok, so the stiffer shorter suspension also helps there, granted.
So how practical is my machine now, is it worth it? The future will tell, but one thing is already clear: It won't be fun to get on a sandy trail, since the narrow high pressure tires will sink easily into the sand. The smoother the road the better the comfort is with these tires. Then again, when the changes are a bit less drastic I am sure that 35-406 Kojaks will also fit and that is a pretty standard velomobile tire.
Ohw, I almost forget: stability did indeed get significantly better. All the corners on my commute can be dealt with faster than before and it is easy to control the Mango. I am even thinking of picking up an old habit to try and beat my fastest commuting time. If only the other commuters and schoolkids wouldn't look so angry in my mirror when I swoosh by them..... I meet them everyday, so I'd better stay friends.
Ohw, I almost forget: stability did indeed get significantly better. All the corners on my commute can be dealt with faster than before and it is easy to control the Mango. I am even thinking of picking up an old habit to try and beat my fastest commuting time. If only the other commuters and schoolkids wouldn't look so angry in my mirror when I swoosh by them..... I meet them everyday, so I'd better stay friends.
Can something be done to get the full range of up to 42-406 tires for the Mango Sport back? Yes there is, but it is not simple, because it means changing the molds of the Mango. These molds are very capital intensive, since it took very long to make them. Changing the wheel arches of the Mango molds to allow for more negative camber will mean a big investment.... For now I will keep on making small adjustments to the wheel alignment to make the most of what we have now.
zaterdag 19 mei 2012
Ride to SPEZI. Day 1: Unprepared rider to the pedals.
After setting off towards the Youth Hostel in Munster, I had to adjust the BB7 disc brakes several times to get them to brake exactly equal. On flat ground it's not a big problem, but I was going to meet hills later and in a fast downhill you don't want your velo to veer off into one direction or the other.....
 |
| destination day1: youth hostel in Munster |
Cycling in Germany is completely different from the Netherlands. Munster and Groningen are both cities where many people cycle, but in Munster the facilities are not nearly as good as in my hometown. The cyclepaths are mostly horrible, narrow and in town space is shared with pedestrians. Now really! The discontinuity of cycling routes is very bad for me as a long-distance cyclist. Especially outside the cities I prefer the safety of the segregated cyclepath, but the quality is so variable that many times I feel that I'd better switch to the road. This is often a dodgy maneuver because of all kinds of obstacles between cyclepath and road. I would navigate a lot quicker when, like many German velomobilists, I would default to the road. I really do not feel safe there though.... I mean, there are blind bats in all traffic categories, but the ones in heavy steel cages are definitely the scariest. Despite this, I am experienced enough to deal with that. I just can't help but thinking about the less confident and very young cyclists that are put off by less safe conditions. When that happens ultimately only the sporty riders and thrillseekers remain and cycling for getting around town will suffer.
It's a shame that Germany does not seem to identify cycling as a viable, non-pollutant and healthy way to get around that should be encouraged more by means of safe cycling for everybody, especially since they are doing very well in the field of alternative energy sources: I saw many roofs covered with solar panels and huge windmills were abundant.
 |
| part of the track, not the shortest route (cough) |
Knowing my sorry state of fitness, I had planned to take it easy, but in hindsight my average heartrate was 147bpm. What!? Too high for long distance cycling, so no wonder that after a shower and a good meal at a Greek restaurant I felt very sleepy and I went to sleep early to be fit for the next day when I would meet the first serious hills.
So far to the uneventful first day, things would get more interesting in the following days.....
zondag 8 april 2012
The flip point: extremely narrow tires on velos
Rolling resistance is the energy that is lost when the tire deforms in contact with the road and the rubbing of the rubber molecules amongst each other. There are several ways to make these losses smaller. Narrow racing tires typically use the most advanced techniques to lower the rolling resistance (RR) like more and thinner threads to make a thinner and more supple tire possible and better rubber compounds. For wider touring tires, the tire producers tend to give more attention to puncture proofness and durability. I think I can safely say that the HPV scene is slowly changing this, because there are a lot of geeks among them that like to push the tire producers towards Speed.
Especially velos do not really need the low aerodynamic drag of a narrow tire, because they usually are embedded in wheel arches where they are almost completely out of the airflow anyway. Since a wide tire deforms less than a narrow tire they can have a lower rolling resistance, but only when the rubber compound and the tire casing shows up similar techniques as the narrow racing tire. However, the narrow tire has a last line of defense! It can be pumped up much harder than a wide tire before bursting. A hard tire deforms less in contact with the road, so less RR.
The following question came to my mind: how practical is it to use narrow racing tires on a velo?
To come up with an answer, I have ridden Schwalbe Durano 28-406 on the front wheels all winter long and for a shorter period the most extreme 20" tire on the market: Schwalbe Ultremo 23-406.
Durano: a racy tire but much more durable than it's predecessor the Stelvio (not in produktion anymore). I managed to wreck the sidewall of a Stelvio in one race, but the Duranos' can handle almost anything I throw at them. Almost, for the one thing that took one of the Duranos' out prematurely was heavy braking to the point that I lock up the wheel. The abrasion was too much and the road simply scrubbed right through the canvas, also destroying the tube inside.
 |
| destroyed Durano, the canvas scrubbed through |
As to the riding experience: the Duranos' are fast tires and they give the Mango the smallest possible turning circle, so agility is also better. The feel in corners is very direct, so I know exactly what is going on. Because of the 9,5 bar of pressure I keep in them, they do not bulge under the heavy load in fast cornering like wide tires do, especially when the pressure is down to a very comfortable level. Especially in roundabouts the velo may become a "Gallopin' Gertie" with the loaded front tire hopping up and down uncontrollably until you slow down. I like to go fast in corners, so this all is a big plus for me.
Not related to RR, but the light weight does also contribute to the riding experience, since I do relatively much riding in town. A lighter tire accelerates easier, since there is less rotational weight to bring into movement. Likewise, braking is a bit quicker but as written before, it is wise to not let the wheel lock up completely.
On a sidenote: I have put on lighter wheels with narrower rims to have even less rotational weight. The narrow rim is also better suited to such a narrow tire.
Comfort is of course less than what I was used to, but since the Mango has good shocks it's not much of an issue. I got used to it soon enough, but I do avoid getting next to the road and ride much slower on cobblestones. High pressure in the tires does make the velo noisier as impacts are simply more intense. Despite the high pressure and ensuing small contact patch, there still is a reasonable amount of grip on the road. I was surprised by that, since I had the idea that the high durability (for a narrow racing tire) must have something to do with a hard, slippery compound. Not so: the grip is not much less than that of the wider Kojak.
To make things more interesting, we had snow for a while this winter and one might think that a narrow tire is not good for that. Sometimes it's completely the other way around then you'd expect: the Durano cuts through fresh snow easily and does not have to displace as much snow as wide tires, so riding takes less effort and you stay in contact with the road. The non-driven front tires do not need to give traction, so that is not an issue either.
Apart from the above mentioned flat because of the abrasion of the tire, I had no flats all winter. The thin Raceguard protection that Schwalbe puts in seems to do a pretty good job.
Maybe you have noticed that I put in 1 bar more pressure than Schwalbe gives as maximum pressure. I do so, because high pressure cuts the RR from narrow tires enormously and I somehow have a lot of confidence that the Durano is strong enough, unlike the old Stelvio.
So overall the Durano is pretty practical, be it that you won't like to do dirt trails with it as it sinks away too easily there.
Ultremo: Given the rather good impression I got from the Duranos' it only seemed logical to take it even further. The even lighter, narrower Ultremo tire. The ultimate in the line-up from Schwalbe.
 |
| Ultremo: best kept on the shelve until racing day? |
In all other respects the Ultremo is a Durano on steroids and so far it also seems to be strong enough. Only the pressure that is needed to keep this tire going good, is enough for me to completely disqualify it as a practical tire. If you seriously want the max in speed however, this is it.
As you may know, I have an enormous collection of YouTube vids. Here is one featuring the Duranos:
Don't forget to alter the setting on the bicycle computer:
circumference Durano @9,5bar=146cm
circumference Ultremo @11bar=144cm
Abonneren op:
Posts (Atom)